Creating a Rule
This guide walks through creating a tool policy rule, from choosing what it targets to placing it in the list.
This guide walks through creating a tool policy rule, from choosing what it targets to placing it in the list.
Before you begin
- You must be a workspace admin.
- Know which tool you want to control. If you are not sure of its name, you can look it up while you type.
- Decide whether the rule should allow or block. Most workspaces keep the default at Allow and add rules that block.
Steps
1. Open the rule editor
Open Permissions and select the Tool Policies tab. Click New Rule in the top right.
2. Choose the action
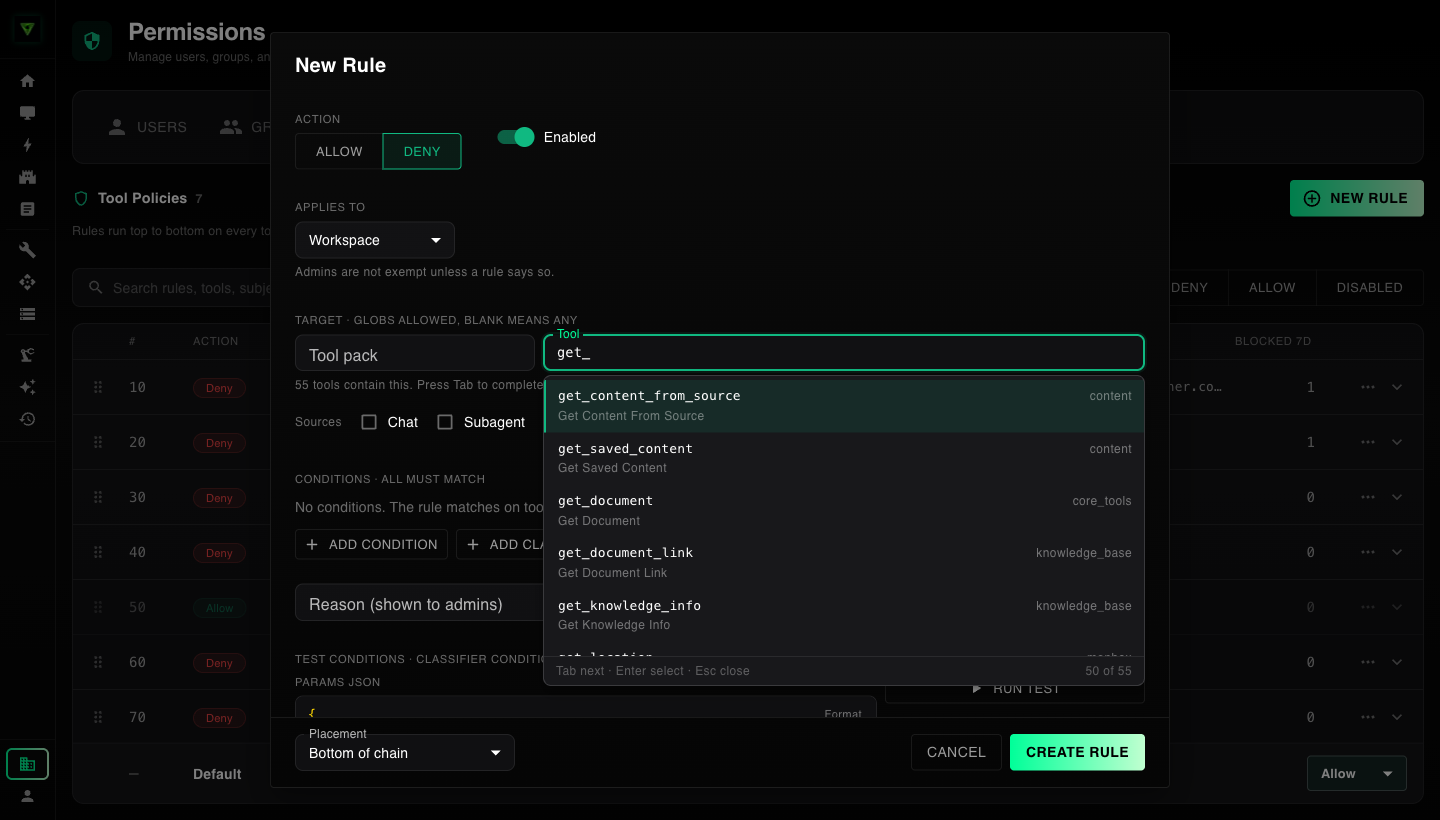
Under Action, select Deny to block matching calls or Allow to permit them. Leave Enabled switched on unless you want to save the rule without putting it into effect yet.
3. Choose who the rule applies to
Under Applies to, pick one of the following:
| Option | Who it covers |
|---|---|
| Workspace | Everyone in the workspace |
| Role | All admins, or all members |
| Group | Everyone in one group |
| User | One person |
| Subagent | Calls made by one agent |
For Role, Group, User, and Subagent, a second field appears so you can pick which one. Admins are covered by workspace rules like everyone else.
4. Choose the target
Under Target, fill in Tool pack, Tool, or both. Leave both blank to target every tool.
Both fields complete as you type. Start typing and press Tab:
- If one tool matches, the name is filled in.
- If several match, the text extends as far as they agree and a list opens. Press Tab to move through the list and Enter to choose.
- Choosing a tool from the list fills in its Tool pack for you.
You can also type a pattern. Use * for any run of characters and ? for a single character. For example, delete_* targets every tool whose name starts with delete_.
A line under the target tells you what it covers. While you are still typing a name, it shows how many tools contain what you have typed. If it says no tool in the workspace matches, check the spelling before you continue, because the rule would never apply.
5. Limit the sources (optional)
Next to Sources, tick the places a call can come from if you want the rule to apply only there. Leave them all unticked to cover every source.
| Source | Calls that come from |
|---|---|
| Chat | A person chatting in Assist |
| Subagent | An agent, including scheduled runs |
| MCP | An external AI client connected through an MCP server |
| Workflow | A project workflow |
| Direct | A sandcastle app or another direct call |
6. Add conditions (optional)
A rule with no conditions matches on the tool and the caller alone. To look at the values in the call, click Add condition. See Writing conditions for the details.
To have another tool judge the call, click Add classifier. See Using a tool as a classifier.
7. Explain the rule
- In Reason (shown to admins), write why the rule exists. This appears in the rule list and in Tool History.
- In Message returned to the model on deny, write what the AI should be told when the call is blocked. A good message says what to do instead, such as "Deleting rows is not allowed. Ask an admin to run this change."
8. Test the conditions
Under Test conditions, enter example values in Params JSON and click Run test. The result shows whether each condition matched. If the rule targets a single tool, click Fill from tool to start with that tool's parameters filled in.
This test checks conditions only. To test the whole list, including who the rule applies to, use the simulator.
9. Place the rule and save
At the bottom left, use Placement to choose where the rule goes: Top of chain, Bottom of chain, or after a specific rule. Rules are read from the top, and the first match wins, so place exceptions above the broader rules they carve out of.
Click Create Rule. The rule appears in the list and takes effect on the next tool call.